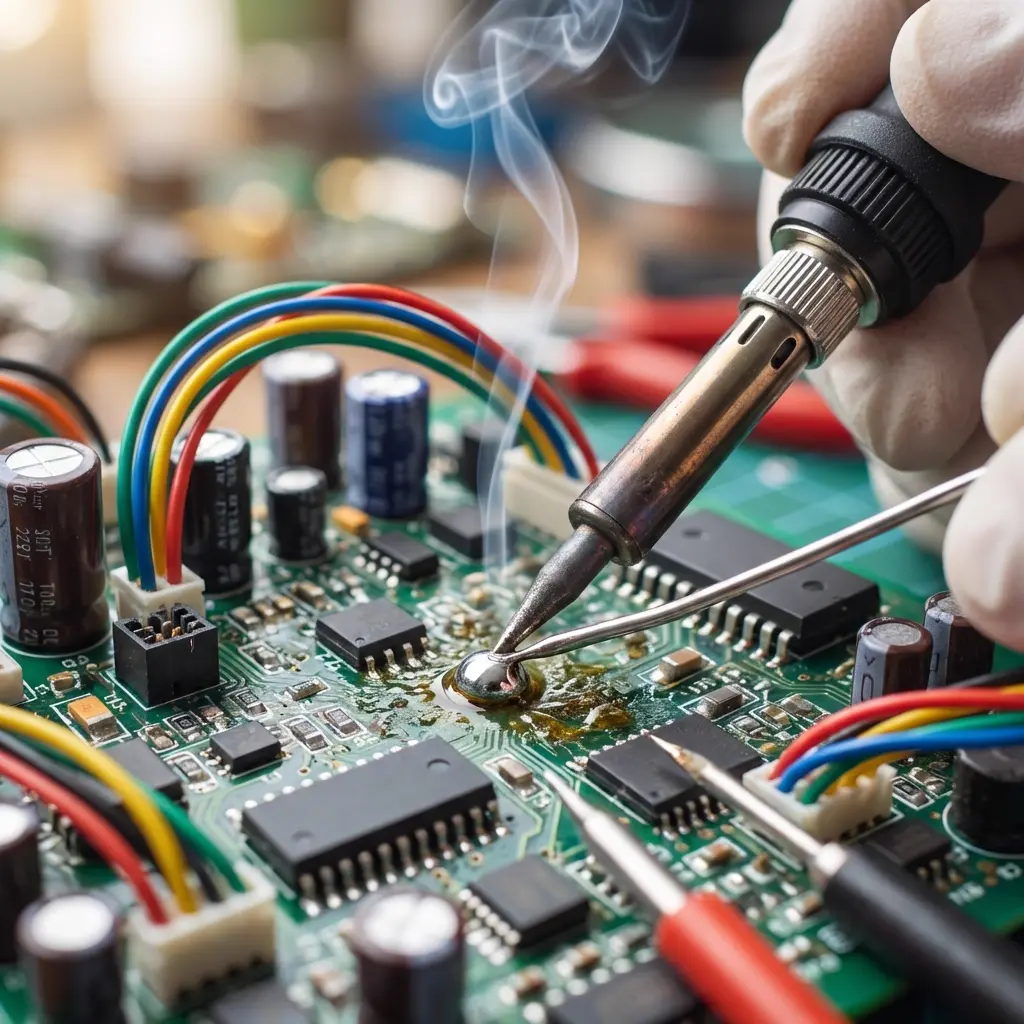
Soldering is the foundational skill of electronics. Whether you're assembling a simple blinking LED kit or prototyping a complex IoT board with fine-pitch chips, the quality of your solder joints determines the reliability of your project. In this guide, we'll dive deep into best practices for both Through-Hole (THT) and Surface-Mount (SMT) components.
📋 Quick Answer
Good soldering requires the right temperature, plenty of flux, and steady hands. Use approximately 350°C for leaded solder and 370°C for lead-free. Always apply flux to the pads before soldering, especially for SMT components, to ensure proper wetting and prevent bridges.
1. The Foundation: Temperature & Tools
Setting the right temperature is critical. Too low, and you'll get "dry" joints; too high, and you risk lifting PCB pads or damaging sensitive components.
Recommended Temperature Settings
| Solder Type | Recommended Iron Temp | Notes |
|---|---|---|
| Lead-Based (60/40 or 63/37) | 330°C - 350°C (625°F - 660°F) | Easier to work with, lower melting point. |
| Lead-Free (SAC305) | 360°C - 380°C (680°F - 715°F) | Requires more heat, oxidizes faster. |
💡 Pro Tip: Thermal Mass Matters
If you're soldering to a large ground plane or a thick connector, you may need to increase the temperature by 10-20°C to compensate for the heat being wicked away by the copper.
2. The Magic of Flux
Flux is not optional—it's essential. Its primary job is to remove oxidation from the metal surfaces and prevent new oxidation during the heating process. It also reduces surface tension, allowing solder to flow smoothly.
- Use External Flux: Even if your solder has a flux core, applying additional tacky flux or a flux pen makes a massive difference, especially for SMT.
- Clean Before & After: Use Isopropyl Alcohol (IPA) to clean the pads before soldering and to remove sticky residue afterward.
3. Through-Hole Technology (THT) Best Practices
THT components like resistors and capacitors are relatively forgiving, but follow these steps for the perfect "volcano" joint:
- Heat Both: Touch the iron tip so it contacts both the component lead and the PCB pad simultaneously. This creates a "heat bridge."
- Apply Solder: Introduce the solder wire to the opposite side of the joint (where the pad and lead meet). The heat from the components—not the iron—should melt the solder.
- Remove the Solder: Pull the solder wire away once enough has flowed to form a fillet.
- Remove the Iron: Finally, lift the soldering iron tip away. This specific sequence prevents the solder wire from getting stuck in a cooling joint.
4. Surface-Mount Technology (SMT) Best Practices
SMT requires a different approach. Since the components are tiny and have no leads to steady them, precision is key.
The One-Pad Method
For passives (resistors/capacitors):
- Apply a small amount of solder to just one pad.
- Hold the component with tweezers, reheat the tinned pad, and slide the component in.
- Remove heat and let it solidify (holding the component steady).
- Solder the other side normally.
Drag Soldering for ICs
For multi-pin chips, apply plenty of flux across all pads, tack down two opposite corners, and then "drag" a small bead of solder across the pins. The flux and surface tension will pull the solder onto the pads and away from the gaps, preventing bridges.
5. How to Prevent "Dry" (Cold) Solder Joints
A dry joint is a connection that looks dull and grainy, often failing over time. Here is how to avoid it:
- Keep the Tip Tinned: Always keep a small bead of fresh solder on your iron tip. This creates a "heat bridge" for faster transfer.
- Don't Move: Ensure the component lead doesn't move while the solder is cooling (usually 1-2 seconds).
- Clean Surfaces: Oxidation is the enemy. If a joint won't take solder, re-flux it or clean the pad.
6. Gauging the Result: The "Aero" Inspection
How do you know you've done a good job? Use these visual cues:
- Luster: Lead-based solder should be shiny. Lead-free is naturally slightly duller but should still look smooth.
- Fillet Shape: The solder should be concave (curving inward). If it looks like a ball or a blob (convex), you have too much solder or insufficient wetting.
- Wetting Angle: The solder should "feather" out onto the pad, not sit on top of it like a drop of water on a waxed car.

✅ Perfect THT Joint
Shiny, concave volcano shape.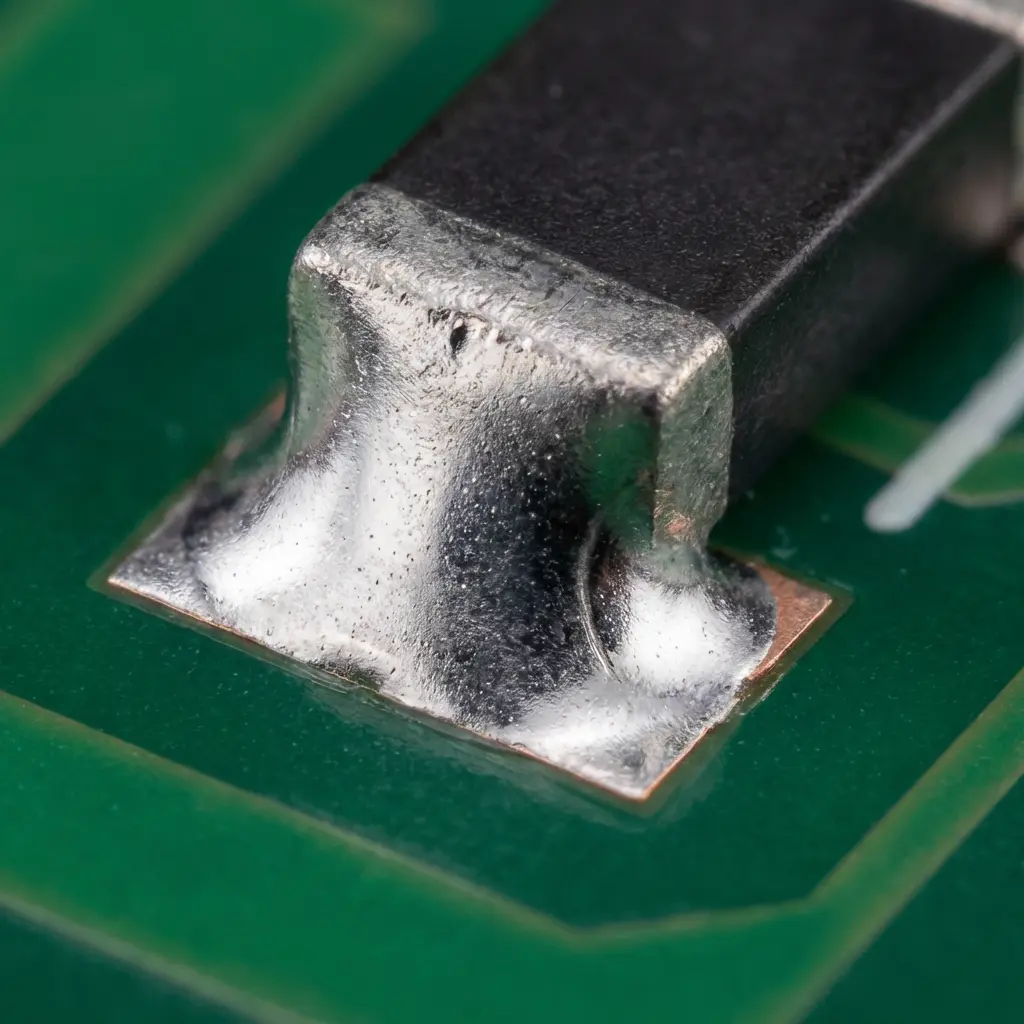
✅ Perfect SMT Joint
Smooth fillet, perfect wetting.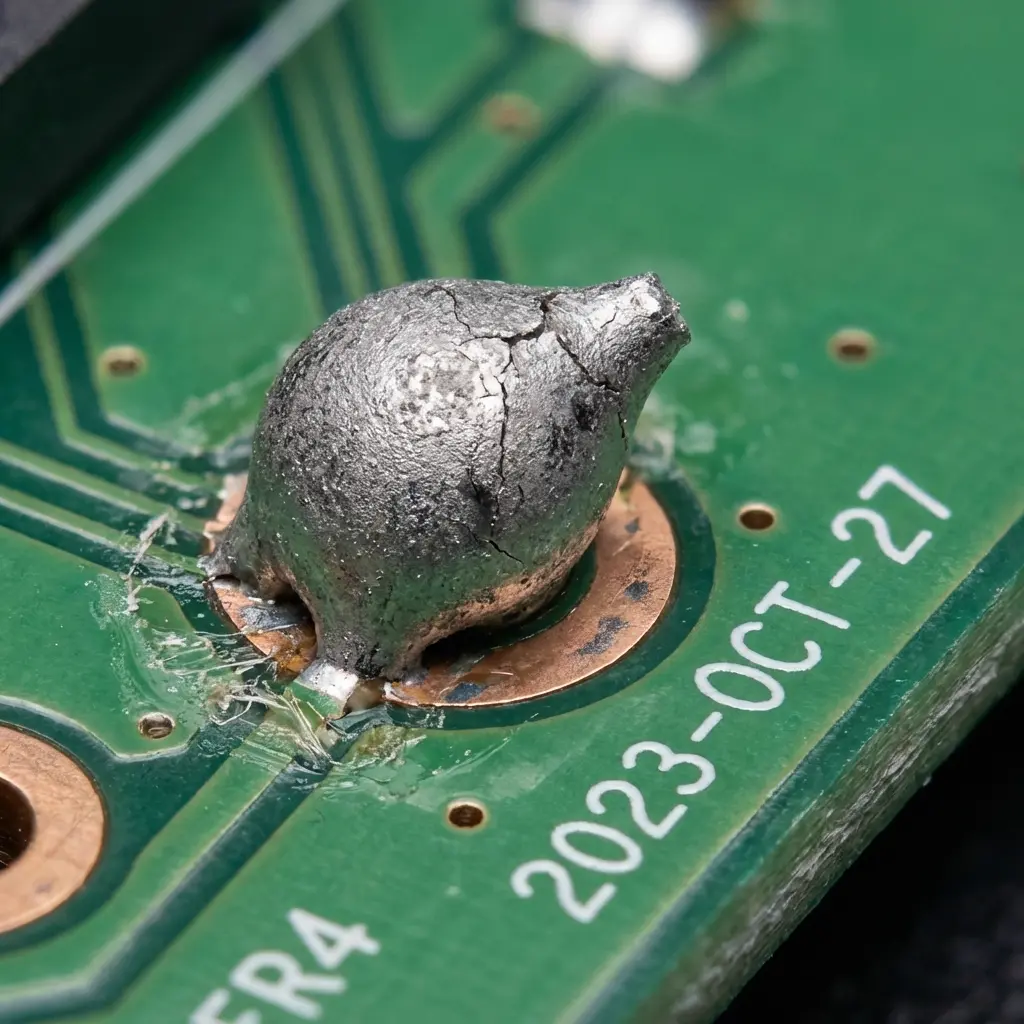
❌ Bad Dry Joint
Dull, grainy, and ball-like.🔍 Final Checklist
- Is the joint shiny or smooth?
- Does the solder cover the entire pad?
- Is the component flush against the board?
- Did you clean the flux residue?
Conclusion
Hand soldering is an art that improves with practice. By mastering temperature control, embracing the power of flux, and knowing what a good joint looks like, you'll significantly increase the success rate of your builds. Happy making!