Weather Station with LCD Display
Build a complete weather monitoring station using Arduino! This beginner-friendly project measures temperature, humidity, and atmospheric pressure, displaying real-time data on a 16x2 LCD screen. Perfect for learning about sensors, I2C communication, and data visualization.
Project Overview
This weather station project is designed to introduce beginners to the world of Arduino and sensor integration. You'll learn how to read data from environmental sensors and display it on an LCD screen, creating a functional device that can monitor indoor conditions.
The project uses the popular DHT22 sensor for temperature and humidity readings, combined with a BMP280 pressure sensor for atmospheric pressure measurements. All data is displayed on a 16x2 LCD with I2C backpack, making wiring simple and straightforward.
💡 What You'll Learn
- Reading data from digital temperature and humidity sensors
- Working with I2C communication protocol
- Displaying data on an LCD screen
- Using Arduino libraries for sensor integration
- Basic circuit assembly and wiring techniques
Components Required
| Part Name | Qty |
|---|---|
| Arduino Uno R3 | 1 |
| DHT22 Sensor | 1 |
| BMP280 Pressure Sensor | 1 |
| 16x2 LCD with I2C | 1 |
| Breadboard | 1 |
| Jumper Wires | 10-15 |
Circuit Diagram
Connect the components according to the wiring diagram below. The I2C devices (LCD and BMP280) share the same SDA and SCL pins, which simplifies wiring significantly.
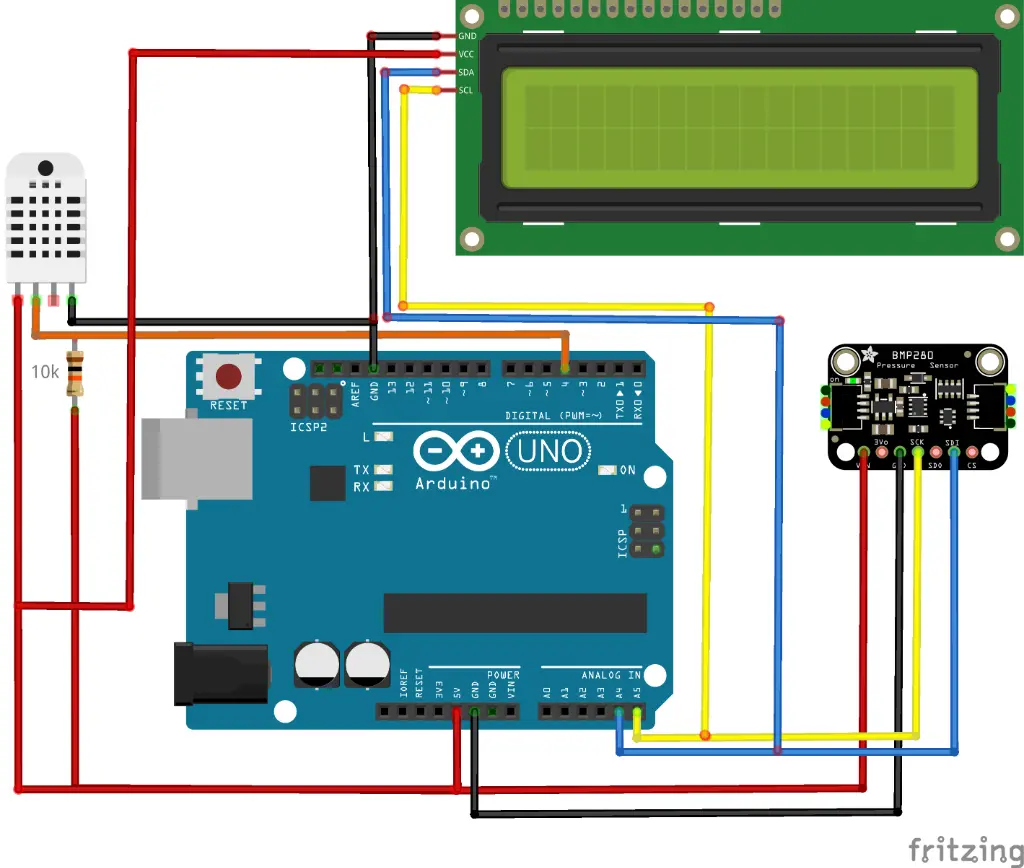
🔍 Pin-to-Pin Connection Summary
- I2C Bus: Connect SDA (Yellow) to A4 and SCL (Blue/White) to A5 on both LCD and BMP280.
- DHT22 Data: Connect DATA (Orange) to Arduino Pin 4.
- Power: Connect all VCC/VIN pins to the 5V rail and all GND pins to the GND rail.
Wiring Connections Table
| Component Pin | Arduino Pin | Notes |
|---|---|---|
| DHT22 VCC | 5V | Power Input |
| DHT22 GND | GND | Ground |
| DHT22 DATA | Digital Pin 4 | Add 10kΩ Pull-up to VCC |
| BMP280 VCC | 5V (or 3.3V) | Check module rating |
| BMP280 GND | GND | Ground |
| BMP280 SDA | A4 | I2C Data |
| BMP280 SCL | A5 | I2C Clock |
| I2C LCD VCC | 5V | Display Power |
| I2C LCD GND | GND | Ground |
| I2C LCD SDA | A4 | I2C Data |
| I2C LCD SCL | A5 | I2C Clock |
⚠️ Important Safety Note
Always disconnect power before making wiring changes. Double-check all connections before powering on to avoid damaging your components. The Arduino should be powered via USB during development.
Step-by-Step Instructions
Install Required Libraries
Open Arduino IDE and install the following libraries via Library Manager: DHT sensor library by Adafruit, Adafruit BMP280 library, and LiquidCrystal_I2C library. These libraries handle all the complex sensor communication for you.
Assemble the Circuit
Place all components on the breadboard. Connect **DHT22 VCC** to Arduino **5V** and **DATA** to pin **4** (with a 10kΩ pull-up). Connect both **BMP280** and **LCD** to the I2C bus: **SDA** to **A4** and **SCL** to **A5**. Ensure a common ground for all parts.
Upload the Code
Copy the Arduino sketch below and upload it to your board. The code reads sensor data every 2 seconds and updates the LCD display with temperature, humidity, and pressure readings.
Test and Calibrate
Power on your Arduino and verify the LCD displays sensor readings. Compare with a reference thermometer to ensure accuracy. You may need to adjust the LCD contrast using the potentiometer on the I2C backpack.
Arduino Code
// Weather Station with LCD Display
// MakersDeck Arduino Project

#include <Wire.h>
#include <LiquidCrystal_I2C.h>
#include <DHT.h>
#include <Adafruit_BMP280.h>

// Pin definitions
#define DHTPIN 4
#define DHTTYPE DHT22

// Initialize components
LiquidCrystal_I2C lcd(0x27, 16, 2);
DHT dht(DHTPIN, DHTTYPE);
Adafruit_BMP280 bmp;

void setup() {
  Serial.begin(9600);

  // Initialize LCD
  lcd.init();
  lcd.backlight();
  lcd.print("Weather Station");

  // Initialize sensors
  dht.begin();

  if (!bmp.begin(0x76)) {
    lcd.setCursor(0, 1);
    lcd.print("BMP280 Error!");
    while(1);
  }

  delay(2000);
}

void loop() {
  // Read sensor values
  float temp = dht.readTemperature();
  float humidity = dht.readHumidity();
  float pressure = bmp.readPressure() / 100.0;

  // Display on LCD
  lcd.clear();
  lcd.setCursor(0, 0);
  lcd.print("T:");
  lcd.print(temp, 1);
  lcd.print("C H:");
  lcd.print(humidity, 0);
  lcd.print("%");

  lcd.setCursor(0, 1);
  lcd.print("P:");
  lcd.print(pressure, 1);
  lcd.print(" hPa");

  delay(2000);
}
💡 Code Tips
- The I2C address for the LCD might be 0x3F instead of 0x27 - run an I2C scanner sketch to find the correct address
- The BMP280 can use address 0x76 or 0x77 depending on the module
- Add a 10kΩ pull-up resistor to the DHT22 data line for reliable readings
Related Projects
Interested in similar projects? Check out these related builds: