DHT22 Temperature & Humidity Sensor
Complete Tutorial: From Basics to Real-World Application
1. Introduction
The DHT22 (also known as AM2302) is a digital temperature and humidity sensor widely used in DIY electronics, weather stations, home automation, and IoT projects. It stands out from its predecessor, the DHT11, by offering higher accuracy and a wider measurement range.
This tutorial will guide you through understanding the sensor's working principle, technical specifications, wiring connections, and provide a complete real-world project example that you can build and extend.
📦 What's Included in Most Kits
- 1x DHT22 Sensor Module (with breakout board)
- Some kits include a 10kΩ pull-up resistor (required for bare sensors)
2. Technical Specifications
Before wiring any sensor, it's important to understand its electrical and operational characteristics. Here are the key specifications for the DHT22:
| Parameter | Specification |
|---|---|
| Operating Voltage | 3.3V – 5V DC |
| Temperature Range | -40°C to +80°C |
| Temperature Accuracy | ±0.5°C |
| Humidity Range | 0% – 100% RH |
| Humidity Accuracy | ±2% RH |
| Communication Protocol | Single-Wire Digital (Proprietary) |
| Sampling Rate | 0.5 Hz (once every 2 seconds) |
| Response Time | ~2 seconds |
How It Works
The DHT22 uses a capacitive humidity sensor and a thermistor to measure the surrounding air. It converts the readings to digital signals using an internal chip, which then transmits the data over a single data wire using a proprietary timing-based protocol.
The microcontroller sends a start signal, and the DHT22 responds with a 40-bit data packet containing:
- 16 bits for humidity (integer + decimal)
- 16 bits for temperature (integer + decimal)
- 8 bits checksum for data verification
💡 Pro Tip
The DHT22 can only be queried once every 2 seconds. Reading it faster will result in stale data or read errors. Always add a 2-second delay between readings in your code.
3. DHT22 vs DHT11 Comparison
Choosing between the DHT11 and DHT22 depends on your project requirements:
| Feature | DHT11 | DHT22 |
|---|---|---|
| Temperature Range | 0°C to 50°C | -40°C to 80°C |
| Temperature Accuracy | ±2°C | ±0.5°C |
| Humidity Range | 20% – 80% | 0% – 100% |
| Humidity Accuracy | ±5% | ±2% |
| Price | ~$1-2 | ~$4-6 |
| Best For | Basic indoor projects | Precision & outdoor use |
4. Wiring Guide
The DHT22 module typically has 3 or 4 pins. Most breakout modules already include the required pull-up resistor, simplifying the wiring process.
Pin Configuration
| DHT22 Pin | Description | ESP32 Connection | Arduino Connection |
|---|---|---|---|
| VCC (+) | Power Supply | 3.3V | 5V |
| DATA | Digital Signal | GPIO 4 | Digital Pin 4 |
| NC | Not Connected | — | — |
| GND (−) | Ground | GND | GND |
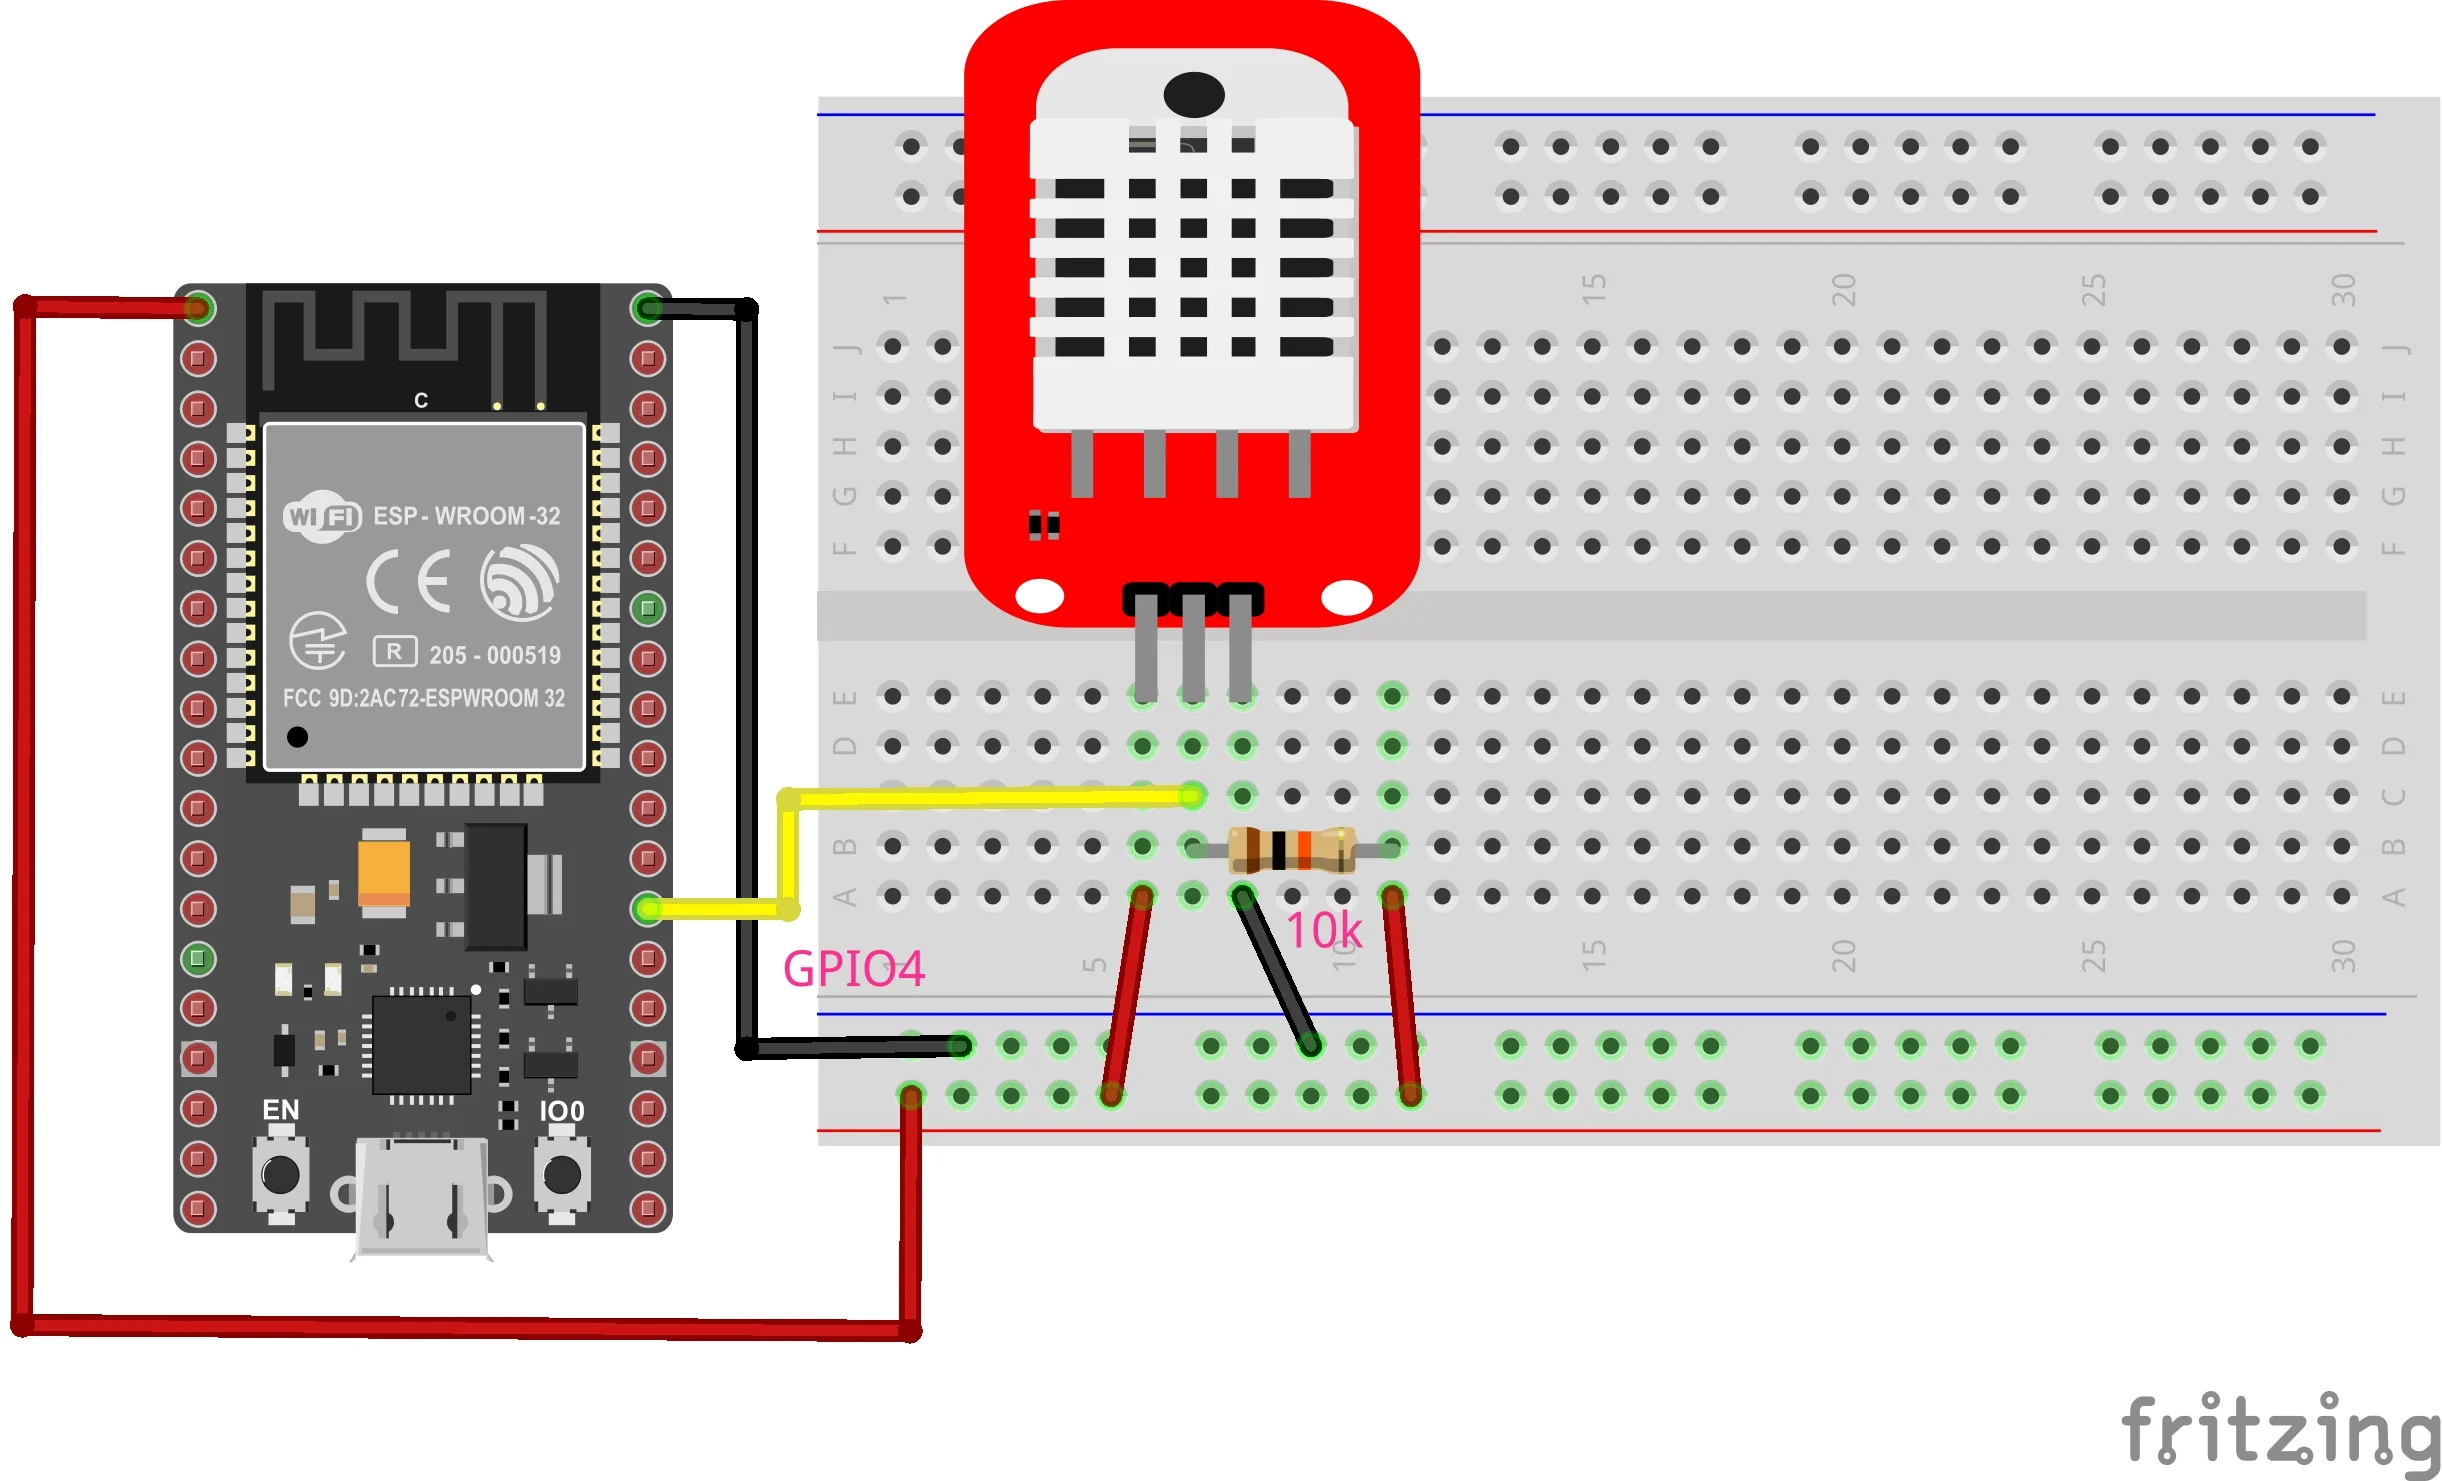
Figure 1: DHT22 wiring with ESP32 — VCC to 3.3V, DATA to GPIO 4, GND to GND
⚠️ Important
If using a bare DHT22 sensor (not a module), you must add a 10kΩ pull-up resistor between VCC and the DATA pin for reliable communication.
5. Real-Life Project: Room Climate Monitor
Let's build a practical Room Climate Monitor that reads temperature and humidity from the DHT22 and displays the data on the Serial Monitor. This can be extended to display on an OLED, log to an SD card, or send data to the cloud.
Required Components
- ESP32 or Arduino Uno
- DHT22 Sensor Module
- Jumper wires (3x)
- Breadboard (optional)
Required Library
Install the DHT sensor library by Adafruit via the Arduino Library Manager:
- Open Arduino IDE
- Go to Sketch → Include Library → Manage Libraries
- Search for "DHT sensor library" by Adafruit
- Click Install (also install "Adafruit Unified Sensor" if prompted)
Complete Code
#include "DHT.h"  // Include the DHT sensor library

// ========== CONFIGURATION ==========
#define DHTPIN 4       // GPIO pin connected to DHT22 DATA pin
#define DHTTYPE DHT22  // Sensor type (DHT22 / AM2302)

DHT dht(DHTPIN, DHTTYPE);  // Initialize DHTsensor object

// ========== SETUP ==========
void setup() {
    Serial.begin(115200);  // Start serial communication
    Serial.println();
    Serial.println("=================================");
    Serial.println("   Room Climate Monitor v1.0");
    Serial.println("   DHT22 Temperature & Humidity");
    Serial.println("=================================");
    Serial.println();

    dht.begin();  // Initialize the sensor
    delay(2000);  // Allow sensor to stabilize
}

// ========== MAIN LOOP ==========
void loop() {
    // Wait 2 seconds between measurements
    // DHT22 sampling rate is 0.5Hz (max once every 2 seconds)
    delay(2000);

    // Read humidity (percentage)
    float humidity = dht.readHumidity();

    // Read temperature in Celsius
    float tempC = dht.readTemperature();

    // Read temperature in Fahrenheit
    float tempF = dht.readTemperature(true);

    // Validate readings
    if (isnan(humidity) || isnan(tempC) || isnan(tempF)) {
        Serial.println("❌ ERROR: Failed to read from DHT sensor!");
        Serial.println("   Check wiring and try again.");
        return;
    }

    // Calculate Heat Index (feels-like temperature)
    float heatIndexC = dht.computeHeatIndex(tempC, humidity, false);
    float heatIndexF = dht.computeHeatIndex(tempF, humidity);

    // Display results
    Serial.println("─────────────────────────────────");
    Serial.print("🌡️  Temperature: ");
    Serial.print(tempC, 1);
    Serial.print("°C  (");
    Serial.print(tempF, 1);
    Serial.println("°F)");

    Serial.print("💧 Humidity:    ");
    Serial.print(humidity, 1);
    Serial.println("%");

    Serial.print("🔥 Heat Index:  ");
    Serial.print(heatIndexC, 1);
    Serial.print("°C  (");
    Serial.print(heatIndexF, 1);
    Serial.println("°F)");

    // Comfort level indicator
    Serial.print("📊 Comfort:     ");
    if (tempC >= 20 && tempC <= 25 && humidity >= 30 && humidity <= 60) {
        Serial.println("✅ Comfortable");
    } else if (tempC < 18) {
        Serial.println("❄️  Too Cold");
    } else if (tempC > 28) {
        Serial.println("🥵 Too Hot");
    } else if (humidity < 30) {
        Serial.println("🏜️  Too Dry");
    } else if (humidity > 70) {
        Serial.println("💦 Too Humid");
    } else {
        Serial.println("👍 Acceptable");
    }
}
Expected Serial Output
=================================
   Room Climate Monitor v1.0
   DHT22 Temperature & Humidity
=================================

─────────────────────────────────
🌡️  Temperature: 24.5°C  (76.1°F)
💧 Humidity:    52.3%
🔥 Heat Index:  24.8°C  (76.6°F)
📊 Comfort:     ✅ Comfortable
─────────────────────────────────
🌡️  Temperature: 24.6°C  (76.3°F)
💧 Humidity:    51.8%
🔥 Heat Index:  24.9°C  (76.8°F)
📊 Comfort:     ✅ Comfortable
6. Ideas for Extension
Once you have the basic climate monitor working, here are some ways to expand the project:
- OLED Display: Add a 0.96" SSD1306 OLED to show real-time readings
- Data Logging: Save readings to an SD card with timestamps
- Web Dashboard: Use ESP32's WiFi to create a web server for remote monitoring
- IoT Integration: Send data to Blynk, ThingSpeak, or Home Assistant
- Alerts: Add a buzzer or LED to warn when conditions are outside comfort range
- Multi-room: Use multiple DHT22 sensors to monitor different rooms
7. Troubleshooting
Problem: "Failed to read from DHT sensor!"
- Double-check your wiring connections
- Ensure VCC is connected to 3.3V (for ESP32) or 5V (for Arduino)
- Try a different GPIO pin
- Add a 10kΩ pull-up resistor if using a bare sensor
Problem: Readings seem incorrect
- Allow the sensor to stabilize for 2 seconds after power-on
- Keep the sensor away from heat sources
- Ensure adequate airflow around the sensor
Problem: Readings are NaN (Not a Number)
- Increase the delay between readings to at least 2000ms
- Check that the correct DHTTYPE is defined (DHT22, not DHT11)
8. Summary
The DHT22 is an excellent choice for projects requiring accurate temperature and humidity measurements. With its wide measurement range, good accuracy, and simple single-wire interface, it's perfect for weather stations, HVAC monitoring, greenhouse automation, and smart home applications.
Key takeaways from this tutorial:
- The DHT22 offers ±0.5°C temperature and ±2% humidity accuracy
- Use the Adafruit DHT library for easy integration
- Always wait at least 2 seconds between readings
- A pull-up resistor is required for bare sensors (modules usually include it)