Your Arduino talks to an SD card at millions of bits per second. A TFT display refreshes 320×240 pixels of colour data in milliseconds. A 16-bit ADC streams 1 million samples per second into a microcontroller. What do all of these have in common? They all use SPI — the Serial Peripheral Interface.
SPI is the speed champion of the short-range embedded communication world. While I²C is designed for multi-device convenience, SPI is designed for raw throughput. If your project needs to move a lot of data fast — displays, memory, fast sensors — SPI is almost certainly involved.
1. What is SPI?
Think of SPI like a very fast conveyor belt between two chips. One chip (the controller, formerly called “master”) drives the belt. The other chip (the peripheral, formerly called “slave”) rides it. Data flows in both directions simultaneously — while the controller pushes bits out, the peripheral pushes bits back.
SPI was invented by Motorola in the 1980s for connecting microcontrollers to peripheral chips on the same PCB. It uses four wires and can run at speeds from a few kHz all the way up to 80 MHz or more on modern microcontrollers. Compare that to I²C’s typical 100–400 kHz ceiling, and you start to see why SPI dominates when speed matters.
2. The four SPI signals
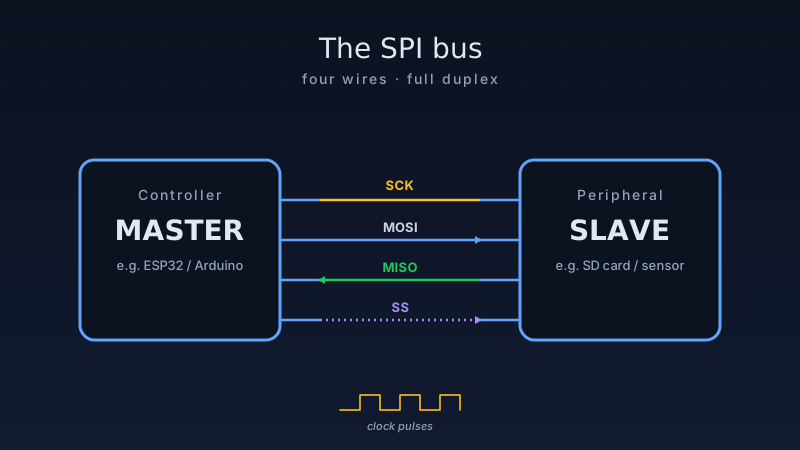
SPI uses exactly four wires. Each one has a specific job:
| Signal | Full name | Direction | Purpose |
|---|---|---|---|
| SCK | Serial Clock | Controller → Peripheral | Synchronises every bit — both sides latch data on each pulse |
| MOSI | Controller Out, Peripheral In | Controller → Peripheral | Data the controller sends to the peripheral |
| MISO | Controller In, Peripheral Out | Peripheral → Controller | Data the peripheral sends back to the controller |
| CS | Chip Select (also called SS) | Controller → Peripheral | Activates a specific peripheral; goes LOW to select |
SCK (Serial Clock) is the heartbeat. Every rising or falling edge of SCK shifts one bit from sender to receiver. The controller always generates the clock — the peripheral just listens and responds. This is what makes SPI synchronous: unlike UART, there’s no baud-rate guessing, no start bits, no framing overhead.
MOSI carries data from your Arduino to the peripheral. Think of it as the “command” wire — when you tell an SD card to read a sector or a display to show a colour, that instruction travels over MOSI.
MISO is the reply lane. When you ask an ADC “what voltage did you measure?”, the answer comes back on MISO while the controller continues driving SCK.
CS (Chip Select) is how you address individual devices. It’s normally held HIGH (inactive). Pulling it LOW tells one specific peripheral “I’m talking to you.” This is why you can share SCK, MOSI, and MISO across many devices — they ignore the bus unless their own CS line goes LOW.
3. How SPI transfers data — bit by bit
Understanding the timing of an SPI transfer helps you debug problems and choose the right SPI mode. When your Arduino sends a single byte over SPI, CS drops LOW, then SCK pulses 8 times. On each clock edge, one bit is shifted out on MOSI and one bit is shifted in on MISO. After 8 pulses, a full byte has crossed the wire in each direction. CS then rises HIGH, framing the transfer.
Most SPI devices send the most-significant bit first (MSB first), so bit 7 leaves the controller on the first clock edge and bit 0 on the eighth. The combination of CS dropping, 8 SCK pulses, and CS rising is the basic unit of every SPI transaction.
4. SPI modes: clock polarity and phase
Different SPI peripherals sample data on different clock edges. SPI has four “modes” to accommodate this. The mode is defined by two settings: CPOL (clock polarity — is idle HIGH or LOW?) and CPHA (clock phase — sample on first edge or second edge?).
| Mode | CPOL | CPHA | Clock idle | Sample on | Common devices |
|---|---|---|---|---|---|
| Mode 0 | 0 | 0 | LOW | Rising edge | SD cards, MAX7219, most displays |
| Mode 1 | 0 | 1 | LOW | Falling edge | Some ADCs (MCP3204) |
| Mode 2 | 1 | 0 | HIGH | Falling edge | Rarely used |
| Mode 3 | 1 | 1 | HIGH | Rising edge | MAX31855 thermocouple, some IMUs |
In practice, Mode 0 covers the vast majority of SPI devices you’ll encounter as a maker. Always check the datasheet — it will specify SPI mode directly, usually as “SPI Mode 0” or by listing the CPOL/CPHA values.
5. Wiring multiple SPI devices
One of SPI’s great strengths is how easily you can connect multiple peripherals to the same bus. SCK, MOSI, and MISO are shared by all devices. Each peripheral gets its own CS line — and only that device is active at any moment.
For example, on an Arduino Uno talking to three peripherals (SD card, TFT display, and SPI ADC):
| Arduino pin | SD card | TFT display | SPI ADC |
|---|---|---|---|
| D11 (MOSI) | MOSI | MOSI | MOSI |
| D12 (MISO) | MISO | MISO | MISO |
| D13 (SCK) | SCK | SCK | SCK |
| D10 (CS1) | CS | — | — |
| D9 (CS2) | — | CS | — |
| D8 (CS3) | — | — | CS |
The key rule: only one CS line should be LOW at any time. If two CS lines go LOW simultaneously, both peripherals will try to drive MISO at the same time, creating a bus conflict that can corrupt data and even damage devices. Arduino’s SPI library handles this for you as long as you manage CS pins correctly in your code.
6. SPI vs I²C vs UART: choosing the right protocol
| Feature | SPI | I²C | UART |
|---|---|---|---|
| Wires (single device) | 4 | 2 | 2 (TX + RX) |
| Wires (N devices) | 3 + N (one CS each) | 2 (shared bus) | 2×N (separate link each) |
| Typical speed | 1–80 MHz | 100 kHz – 1 MHz | Up to ~5 Mbps |
| Full duplex? | Yes | No (half-duplex) | Yes |
| Multi-device | Extra CS pin per device | Up to 127 on 2 wires | Requires multiplexer |
| Distance | Short (<30 cm ideal) | Short (<1 m typical) | Longer (RS-232: 15 m) |
| Best for | Displays, SD cards, fast ADCs | Many small sensors | Point-to-point: GPS, GSM |
Use SPI when: you need speed (displays, SD cards, fast DACs/ADCs), or when you’re transferring large amounts of data. Use I²C when: you have many sensors and limited pins — I²C addresses up to 127 devices on just two wires. Use UART when: talking to a module with its own processor (GPS, Bluetooth HC-05, GSM modem) at longer cable runs.
7. Arduino SPI code: reading a MAX31855 thermocouple
The MAX31855 is a popular SPI thermocouple amplifier that converts type-K thermocouple readings into a 32-bit SPI word. It uses SPI Mode 0, 14-bit resolution, and a single CS pin. Here’s how to read it without any library:
/*
 * MAX31855 Thermocouple Reader via SPI
 * Wiring: SCK=D13, MISO=D12, CS=D10 (no MOSI needed - read-only device)
 * SPI Mode 0, MSB first, 32-bit read, 3.3V VCC
 *
 * The MAX31855 returns a 32-bit value:
 *   Bits 31-18: Thermocouple temperature (14-bit, 0.25 deg C resolution)
 *   Bit  16:    Fault flag (1 = fault present)
 *   Bits 15-4:  Cold junction temperature (12-bit, 0.0625 deg C resolution)
 *   Bits 2-0:   Fault type flags (SCV, SCG, OC)
 */

#include <SPI.h>

const int CS_PIN = 10;  // Chip select for MAX31855

void setup() {
    Serial.begin(115200);
    pinMode(CS_PIN, OUTPUT);
    digitalWrite(CS_PIN, HIGH);  // CS HIGH = device inactive

    // Start SPI at 4 MHz, MSB first, Mode 0
    SPI.begin();
    SPI.beginTransaction(SPISettings(4000000, MSBFIRST, SPI_MODE0));

    Serial.println("MAX31855 Thermocouple Reader Ready");
}

void loop() {
    float tempC = readThermocouple();

    if (isnan(tempC)) {
        Serial.println("Fault: check thermocouple wiring");
    } else {
        Serial.print("Temperature: ");
        Serial.print(tempC, 1);
        Serial.println(" C");
    }

    delay(1000);  // Read once per second
}

float readThermocouple() {
    // Pull CS LOW to begin transfer
    digitalWrite(CS_PIN, LOW);

    // Read 4 bytes (32 bits) MSB first
    uint32_t raw = 0;
    raw  = (uint32_t)SPI.transfer(0x00) << 24;
    raw |= (uint32_t)SPI.transfer(0x00) << 16;
    raw |= (uint32_t)SPI.transfer(0x00) << 8;
    raw |= (uint32_t)SPI.transfer(0x00);

    // CS HIGH = end of transfer
    digitalWrite(CS_PIN, HIGH);

    // Check fault bit (bit 16)
    if (raw & 0x00010000) {
        return NAN;  // Fault present
    }

    // Extract 14-bit thermocouple temperature (bits 31-18)
    // Value is in 0.25 deg C increments, signed 2's complement
    int16_t rawTemp = (raw >> 18) & 0x3FFF;
    if (rawTemp & 0x2000) {       // Sign-extend negative values
        rawTemp |= 0xC000;
    }

    return rawTemp * 0.25f;       // Convert to degrees Celsius
}
Notice the SPISettings(4000000, MSBFIRST, SPI_MODE0) call — this sets clock speed (4 MHz), bit order (MSB first), and mode (0) in one shot. Always wrap SPI transfers between SPI.beginTransaction() and the end of your CS pulse for safe multi-device operation.
8. Driving a TFT display over SPI
Colour displays are the most visually satisfying SPI project. ILI9341-based 2.4″ TFT displays are extremely common and use SPI to receive pixel data at up to 40 MHz. Here’s a minimal setup using the Adafruit_ILI9341 library:
/*
 * ILI9341 2.4" SPI TFT Display - Minimal Hello World
 * Wiring (Arduino Uno):
 *   VCC -> 3.3V or 5V (check module label)
 *   GND -> GND
 *   SCK -> D13  (hardware SPI)
 *   MOSI-> D11  (hardware SPI)
 *   MISO-> D12  (hardware SPI)
 *   CS  -> D10
 *   DC  -> D9   (Data/Command select - specific to TFT displays)
 *   RST -> D8
 * Libraries: Adafruit_GFX, Adafruit_ILI9341
 */

#include <SPI.h>
#include <Adafruit_GFX.h>
#include <Adafruit_ILI9341.h>

const int TFT_CS  = 10;
const int TFT_DC  = 9;
const int TFT_RST = 8;

// Create display object using hardware SPI
Adafruit_ILI9341 tft = Adafruit_ILI9341(TFT_CS, TFT_DC, TFT_RST);

void setup() {
    Serial.begin(115200);
    tft.begin();                    // Initialise over SPI
    tft.setRotation(1);             // Landscape orientation
    tft.fillScreen(ILI9341_BLACK);  // Clear screen

    // Draw text
    tft.setTextColor(ILI9341_CYAN);
    tft.setTextSize(3);
    tft.setCursor(40, 100);
    tft.println("Hello SPI!");

    // Draw a rectangle
    tft.drawRect(20, 20, 280, 200, ILI9341_WHITE);

    Serial.println("Display initialised");
}

void loop() {
    // Nothing - display holds its last state without refresh
}
Notice the extra DC (Data/Command) pin that TFT displays require. This isn’t part of standard SPI — it’s a display-specific signal that tells the driver IC whether the incoming byte is a command (DC=LOW) or pixel data (DC=HIGH). This is why TFT displays need 5 pins instead of the usual 4.
9. Real-world applications
10. Common mistakes & troubleshooting
11. SPI pins on popular maker boards
| Board | MOSI | MISO | SCK | Default CS | Max SPI speed |
|---|---|---|---|---|---|
| Arduino Uno / Nano | D11 | D12 | D13 | D10 | ~10 MHz |
| Arduino Mega 2560 | D51 | D50 | D52 | D53 | ~10 MHz |
| ESP32 (default) | GPIO23 | GPIO19 | GPIO18 | GPIO5 | 80 MHz |
| ESP8266 (NodeMCU) | GPIO13 (D7) | GPIO12 (D6) | GPIO14 (D5) | GPIO15 (D8) | 40 MHz |
| Raspberry Pi Pico | GPIO19 (SPI0) | GPIO16 (SPI0) | GPIO18 (SPI0) | GPIO17 | 62.5 MHz |
On the ESP32 and Raspberry Pi Pico, SPI pins are flexible — you can reassign them to almost any GPIO using the software SPI configuration or the MUX. On classic AVR Arduinos (Uno, Mega), the hardware SPI is fixed to the pins above, though you can use software SPI (slower) on any pins.